In 1832–34 Hercules Florence, working in Brazil, developed the concept of silver- and gold-based photography and a primitive way of image fixing using a urine-based solution. His use of a camera is known in literature, but only copy samples are extant.In 1834–35 William Henry Fox Talbot developed an advanced concept of photography on paper and a method of stabilising both photograms and camera images using a solution of sodium chloride.
Salt Print Recipe.
Salt Print Recipe:
1litre of water
20g of sea salt.
Silver Nitrate
Purified Water
Citric Acid
Process:
1, Soak paper in salt water for 5 minutes.
2, Once the paper has soaked dry with either a hair dryer or simply leave to dry on its own.
3, Mix chemical 1 of 12g of Silver Nitrate and 50ml of distilled water.
4, Mix 50ml of distilled water and 6g of Citric Acid.
5, Mix chemical 1 & 2 and place in a small brown bottle and shake to mix together.
6, Coat the salted paper in the mixed chemical and dry off.
7, Place the object/negative onto the paper (with a glass plate below and on top of the print) and place under the UV light or place in daylight for 10-20 minutes (do small test before final image)
8, After the picture has been exposed place in the fix to expose the print for 5 minutes.
9, After the photo has been in the fix for 5 minutes wash the print in the water for half an hour to wash.
10, Once the paper has washed for half an hour, leave to dry.
I found the salt printing really interesting but the process is quite long however the end results are really great.My first test went quite well and I simply used two small negatives on a small piece of paper.

My first test isn’t the best but I think the images have come out really clear and I really like the contrast. The only thing I would change is the way in which i spread the chemicals across the paper as you can see the brush strokes and a few specs where the chemical hasn’t been spread properly.
I enjoyed Salt Printing so much that I have decided to use this process for my human presence images because of the grainy affect that chemicals leave.
Cyanotypes.
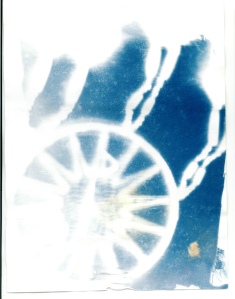
The English scientist and astronomer Sir John Herschel discovered the procedure of the cyanotype in 1842.
Cyanotype is a photographic printing process that produces a cyan-blue print. Engineers used the process well into the 20th century as a simple and low-cost process to produce copies of drawings.
Ingredients:
Combination A:
10g Ferric Ammonium Citrate (green kind)
50ml of tap water
Combination B:
4g Potassium Ferricyanide
50ml tap water
Cartridge or Water Colour Paper.
Brush
Saucer
2 Brown bottles
Measuring jugs.
Hairdryer ( optional)
UV Light (daylight if uv light is unavailable)
Process:
1. Pour mixture A into a brown bottle.
2. Pour mixture B into another separate brown bottle.
3. Mix equal amounts of the mixture A & B in a serrate measuring jug (e.g.10g) and pour into a saucer creating combination C
4. Coat the thick cartridge paper in combination C.
5. Dry with hairdryer or leave to dry completely.
6. Once the paper is dry place the object or negative you are using for the print on the paper and sandwich between two sheets of clean glass.
7. Place the paper (still between the glass sheets) under the Uv light and leave for 20 minutes. If using daylight slightly longer might be needed depending on the weather.
8. After 20 minutes is up use water to rinse the paper.
9. Once the paper is clean, leave to dry.

Photograms.
A photogram is a camera less image in which we use light sensitive paper to expose objects or negatives by using the enlarger or daylight.Anything can be made to use a photogram however objects with interesting outlines or gaps in which the light can pass through will always make an interesting image.
The most common way of making a photogram is by placing certain shaped objects on top of the light sensitive paper however you can also use pictures printed onto acetate and negatives on top of the paper as well.
For my tests I used both objects and acetate to create my photograms.


Pinhole.
A pinhole camera is a simple camera without a lens and with a single small aperture.They can be made out of anything as long as it can be made light tight and is large enough to hold the light sensitive paper in which the picture will be printed onto.
For the pinhole process we made our own pinhole cameras out of beer cans. We simply cut up the beer cans and made them light tight with black tape with a small pin sized hole on the side of the can. To cover the hole in the can we used a small piece of black tape so that the light did not seep though. Once the can was made we used small light sensitive paper ( loaded in the dark) and took outside to create the images. To take the photographs we had to lift the tape away from the hole (letting the light in) for a set amount of time e.g. 5 seconds.
At first it was slightly difficult to get the right time for the lighting however after a few tests the images came out rather good:

I really like the warped effect that the pinhole photography has however the process is quite difficult and takes a lot of patience and paper to get the perfect image. Pinhole photography also isn’t very clear and not everything in the image is in focus so if I were to be photographing something specific then they wouldn’t be the most idea form of dark room process.


